
Product manager by day, Starlink enthusiast by night.
Starlink has already connected millions of people to high-speed internet in regions that have traditionally been deprived of it.
One of Starlink’s major advantages, apart from providing subscribers with high download speeds and flexible cancellation policies, is the easiness with which users can get started.
In the following article, I am walking you through each step of the Starlink installation process to get you up and running within minutes.
The first step is to unbox your Starlink package, which you hopefully received by the time you’re reading this guide.

I detailed what you’ll find in the Standard kit (costing US$599) in a separate article that you can read here. To recap, you receive:
Don’t be surprised if the hardware you unpack seems to have been used. Starlink doesn’t always ship out brand-new kits, primarily to save costs.
But don’t worry: the kit has likely been used for less than 30 days and was thus sent back within Starlink’s 30-day return window.
Furthermore, if you discover any significant damages, then make sure to contact Starlink’s customer support immediately. I detailed those steps in a separate article that you can find here.
While you’re patiently awaiting to receive your kit, you can already go ahead and download Starlink’s mobile app. Starlink maintains apps for both Android and iOS.
Alternatively, you can also manage your Starlink settings from within a browser. Simply navigate to the following URL, which mirrors many of the features available on the app.
But keep in mind that you first need to be connected to Starlink’s Wi-Fi network in order to access settings from a browser.
Before you go ahead and assemble your kit, you first need to find a location that is not obstructed by objects such as trees or buildings.
The way Starlink works is that it connects to the thousands of satellites that roam low-Earth orbit (LEO) at a distance of around 550 km (~ 341 miles) whenever sends a request (uplink) for a webpage or other online content.
Those satellites then receive the data and either pass it through to another satellite (via inter-satellite links) or straight down to a ground station (downlink), which is connected to the internet backbone and sends it to the server you’re trying to access. From there, it passes back up to the satellite and then your dishy.

Signals between all parties (dishy, satellites, ground stations) are transmitted via microwave radio frequencies, which travel in straight lines and thus cannot move through solid objects. As such, finding an unobstructed location is key to minimizing downtime.
Whether mounting your antenna on top of a roof or keeping it on the ground – the Starlink mobile app will allow you to find the best possible spot to minimize obstructions.
First, open the Starlink app and click on START SETUP (picture #1). Then select the antenna that you’ve ordered (picture #2). If you’re subscribed to the Residential plan, then it’s likely the Standard antenna (top-left corner) that you’ve elected.


Starlink’s app then prompts you to plug in your power cables, which I’ll cover in the upcoming section. As such, click on FIND AN INSTALL LOCATION (picture #3) and then elect I’M READY! (picture #4) if you found a suitable spot.


You’ll then have to collect the green dots (picture #5) within your dishy’s theoretical field of view, which is marked by the darkened borders. Once the scan is completed, Starlink’s app will let you know how many theoretical obstructions your antenna will face (picture #6).
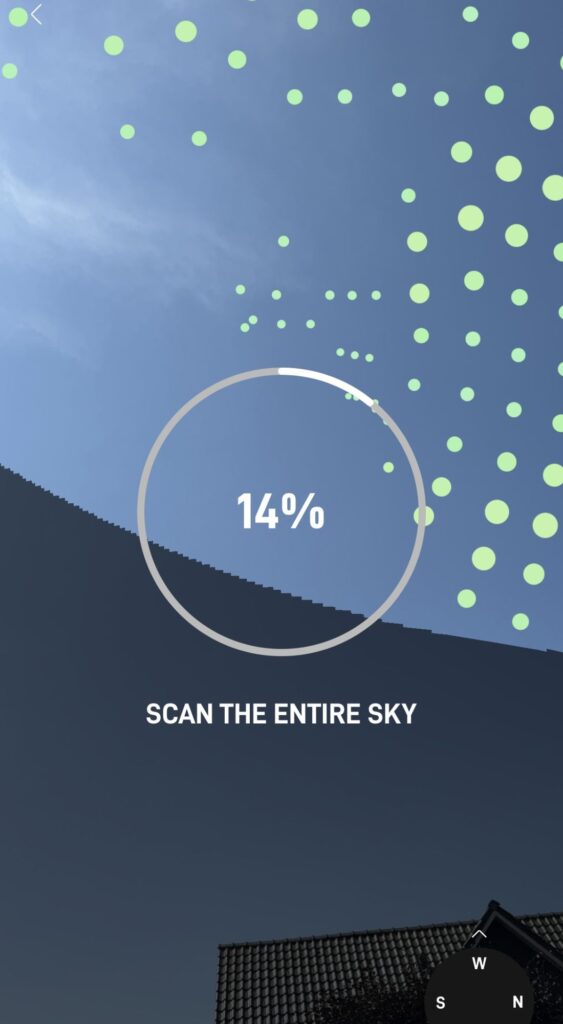

Keep in mind that this is only an approximation. Once your system is fully plugged in, it will collect data for the next 24 hours to determine the actual level of obstructions.
Now that you’ve found a suitable spot, it’s time to power up your Starlink antenna and router. By default, your 50 ft cable comes loosely plugged into the antenna (#7).

Remove the cable by pulling it gently. Don’t apply too much force. Some users, in the past, have reported that they damaged the cable that way.
Once you’ve removed the cable, insert it through the bottom end of your base (#8). Alternatively, you can also plug the cable into your antenna and then onto the base, both of which are fine.

Now insert the cable back into the mast. Make sure that it is fully plugged in. The antenna cable has a habit of not always fully plugging in, thus leading to power disruptions.
One neat trick to ensure that the cable is inserted properly is to cut out a piece of paper, which you’ll then insert below the cable (#9). Once the cable is plugged in, simply remove the piece of paper.

Now it’s time to put the antenna onto the mast. You should hear a clicking sound once it’s inserted properly (#10).
 starlink antenna on base" width="1024" height="768" />
Afterward, take the other end of the 50 ft cable and insert it into the left side of your Wi-Fi router. Do the same with the router’s power cable, which you plug in on the right side.
Once everything is properly connected, you will see a white light in the middle of your router’s bottom located in between the two cable ports (picture #11).

Furthermore, dishy will align itself in a horizontal position (picture #12), which means that it’s booting up.

One of the downsides of Starlink is that it possibly requires you to drill a hole through a wall as the antenna needs to stay connected to the router at all times. Plus, the router is made for indoor usage, so you can’t just place it outside.
I’d recommend first extensively testing Starlink before you begin making any significant alternations to your home.
Now that your dishy is properly powered up, it’s time to connect to the internet. The Starlink app will prompt you to open your phone’s Wi-Fi settings by clicking on OPEN SETTINGS (#13).
 starlink open wifi settings" width="265" height="482" />
By default, Starlink displays two options, which are either called STARLINK or STINKY (in my case it was STARLINK). Simply click on the network. You will then be redirected to the following page (#14).

Here, you can change Starlink’s default name (in the ‘WiFi Network Name’ field) and enter a password (under ‘Enter WiFi Password’). Finish the process by selecting CREATE.
You will then be redirected to Starlink’s mobile app from where you click on CONTINUE. The installation process is essentially completed and you’ll land on the homepage of the Starlink app. 🎉

As mentioned and pictured above (picture #15), Starlink will need around 24 hours to collect obstruction data. Performance should also stabilize after around 15 minutes as the system needs time to calibrate.
Meanwhile, you should also download the latest software update (marked on the homepage) to ensure that all hardware pieces function properly.
In case you’re curious about how fast your Starlink system performs, simply click on SPEED TEST on the app’s homepage (picture #16) or use a third-party provider like Speedtest by Ookla (picture #17).


Personally, I wouldn’t get too hung up on speed test results as long as the overall experience is satisfactory.
There’s too much variance within single results since Starlink speeds are affected by a variety of factors, including
With that said, if you’re subscribed to Residential (like me), you should probably see speeds of around 50 Mbps if you’re located in North America and Australia as well as 100+ Mbps in Europe and the rest of the world.
What I love about Starlink is just how easy and foolproof it is to get started, which I hope this guide highlighted.
If you still have questions or want to share your Starlink experience, then please don’t hesitate to comment down below.